It is very easy to setup Android Development Environment on Eclipse. You have to follow the steps :
http://www.oracle.com/technetwork/java/javase/downloads/index.html
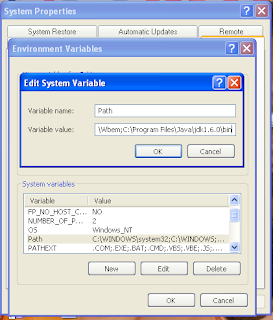
Install JDK and setup path,i.e, if you install in C drive , then you copy the bin folder path, like "C:\Program Files\Java\jdk1.6.0\bin" . After that follow the steps:
- Java SE Development Kite (JDK 5 or newer)
- Eclipse IDE
- Android Software Development Kit (Android SDK)
For Java
You can download Java SE Development Kite from the following link:http://www.oracle.com/technetwork/java/javase/downloads/index.html
- Right Click on "My Computer" and select "Properties" .
- Go to "Advanced" and select "Environment Variables" .
- Under "System Variables" select "Path" and double click on it and paste the Java bin folder path after "%SystemRoot%\system32;%SystemRoot%;%SystemRoot%\System32\Wbem" this in this manner "%SystemRoot%\system32;%SystemRoot%;%SystemRoot%\System32\Wbem;C:\Program Files\Java\jdk1.6.0\bin". If you face any problem then watch this image
For Eclipse and Android SDK
You Can download Eclipse IDE from the following reference link:
It's better to download Eclipse + Android SDK in a single unit from the following reference link:
Unzip the file then you get the following folders :
a) eclipse
b) sdk
c) SDK Manager.exe
Go to "eclipse" folder and double click eclipse.exe . It will ask for work space path where the project will be stored. When the screen open properly then go to Help -> Install New Software -> Add -> On Name filed write "ADT Plugin" and on Location filed put this URL link "https://dl-ssl.google.com/android/eclipse/" .
You can follow this from the following link also :
If you any further query then please communicate with me.
Thanks.


No comments:
Post a Comment